 |
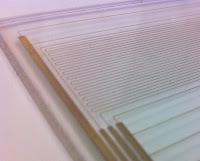
| Example heater and thermistor on glass |
I've read many success stories of using glass on top of a heated build platform, and some struggles as well. Seems that if you can get the plastic to stick throughout the print, removal after cool down is easy. So I've decided to use glass as the top surface, but rather than go the traditional route and just lay it on top of the heater, I'm opting to actually create the heater on the glass surface. I've mentioned previously that the company I work for makes resistors (including heaters and thermistors) on all sorts of substrate materials and shapes including glass vessels. The electrical elements are made by
Micropenning the conductive ink onto the surface then baking. So making a heater and thermistor on a flat square of glass should be easy.
The point of doing it this way for me is to ensure that the glass is very evenly heated since I won't have to worry about even contact with the surface beneath, and possibly to reduce the power requirements for the platform. Oh, and just because I can. I plan to create a test piece this coming week to check the uniformity of the heat distribution on the glass with my heater pattern, as well as to confirm my math on the electrical properties of the heating circuit. I'm not an electrical engineer, and I'm trying not to bother the experts at work too much (though they may say otherwise). I have a couple of nice pieces of scrap borosilicate glass to use from one of our previous projects. I may try standard tempered glass later if it proves out and I decide to make a few more.
 |
| RevK's 11&39 Wade's Gears |
I tweaked my skeinforge settings a little more and printed out these
fantastic gears by RevK. They really do print out very easily and they came out way better than I expected at this point. I think they'll go great on the
Greg's Hinged Accessible Extruder I plan on printing once I can do ABS on my new HBP.


No comments:
Post a Comment